

Implementation & Go-Live
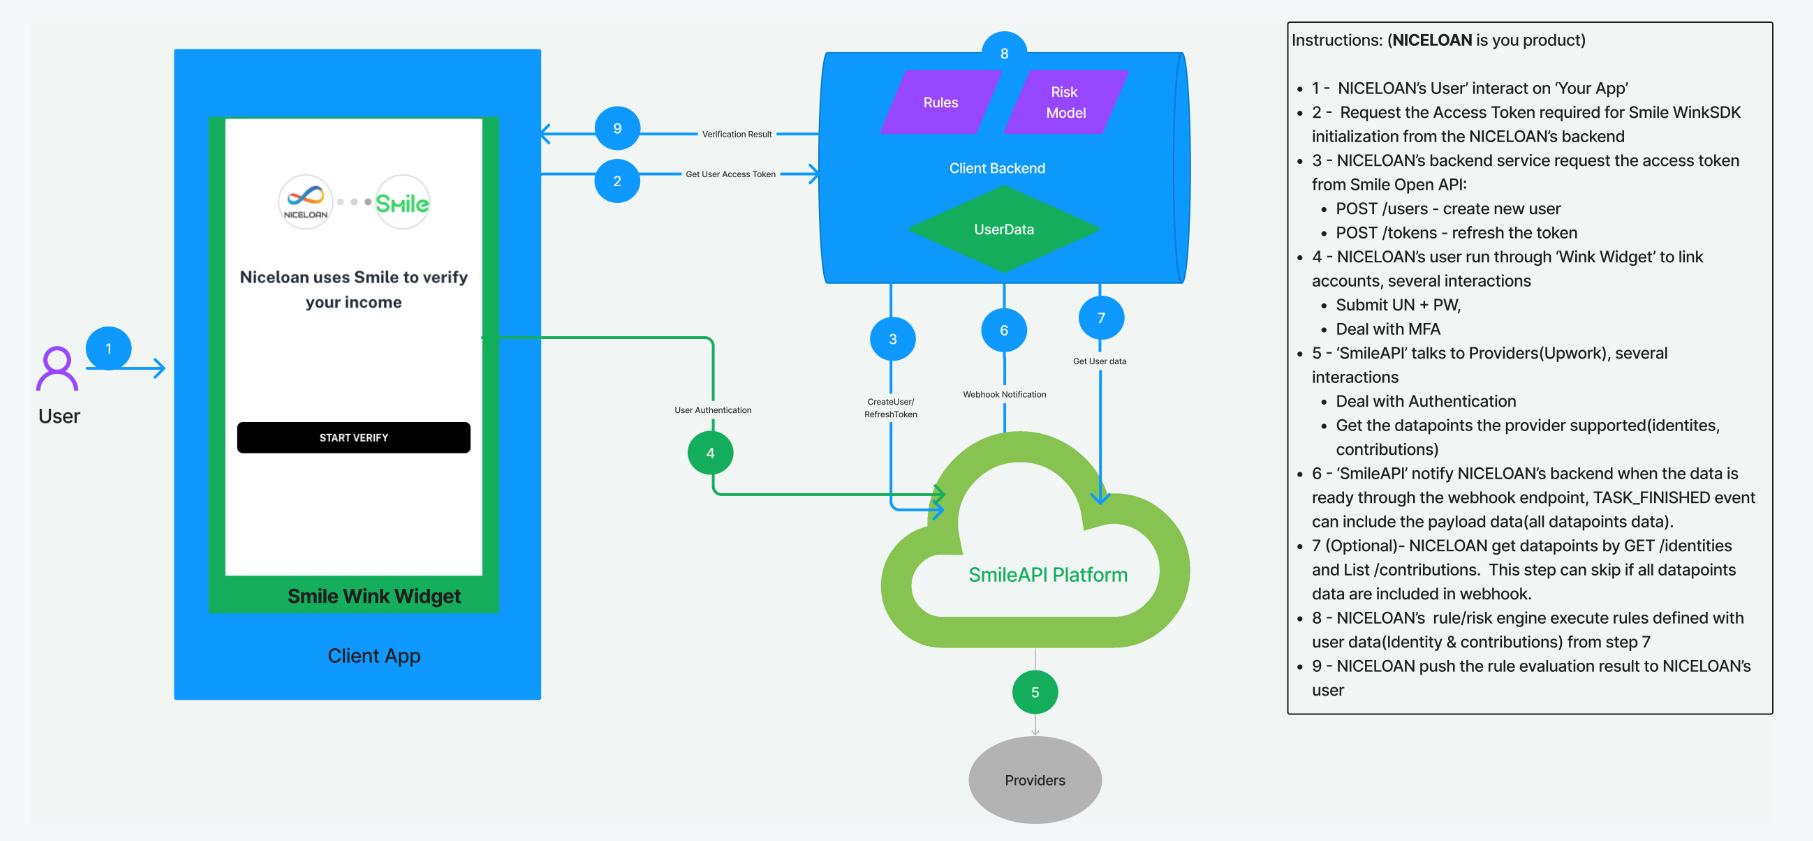
To successfully integrate Smile into your process, we suggest doing so through 3 steps:
- Requirements gathering - explore your use case and what you want to achieve with Smile data.
- Design - design your user journey and integration with Smile.
- Implementation & Go-Live (this guide) - detailed steps to set up and get the integration launched.
Step 1: Implement Smile Wink
If you want the users to connect their employment accounts while on your website or app, you need to integrate the Smile Wink Widget. See below for an example configuration to start:
<!DOCTYPE html>
<html>

<head>
    <meta charset="utf-8" />
    <meta http-equiv="X-UA-Compatible" content="IE=edge" />
    <meta name="viewport" content="width=device-width, initial-scale=1.0">
    <link rel="icon" href="smileicon32.webp" sizes="32x32">
    <link rel="icon" href="smileicon192.webp" sizes="192x192">
    <title>Smile Wink</title>
</head>

<body>
    <script src="https://web.smileapi.io/v2/smile.v2.js"></script>
    <script type="text/javascript">
        const smileLinkModal = new SmileLinkModal({
            // .....

            /**
             * User token(link token) passed from your backend service which is obtained from the Smile API.
             * - For new users, please refer to API reference: https://docs.getsmileapi.com/reference/create-user-1
             * - For existing users, please refer to API reference: https://docs.getsmileapi.com/reference/tokens
             */
            userToken: '<usertoken>',

            /**
             * Use the template ID to determine how your widget looks like embedded in your app or website.
             * You can find and create the template ID in the Smile developer-portal.
             * https://developer-portal.smileapi.io/link/template
             */
            templateId: "<ID of wink template >",

            /*********************************************************************************************************************
            ** Callback Register Section, please refer to API reference: https://docs.getsmileapi.com/reference/chapter-5
            **********************************************************************************************************************/

            /**
             * Account login callback.
             */
            onAccountCreated: ({ accountId, userId, providerId }) => {
                console.log('Account created: ', accountId, ' User ID:', userId, ' Provider ID:', providerId)
            },

            /**
             * Account login success callback.
             */
            onAccountConnected: ({ accountId, userId, providerId }) => {
                console.log('Account connected: ', accountId, ' User ID:', userId, ' Provider ID:', providerId)
            },

            /**
             * Account revoke callback.
             */
            onAccountRemoved: ({ accountId, userId, providerId }) => {
                console.log('Account removed: ', accountId, ' User ID:', userId, ' Provider ID:', providerId)
            },

            /**
             * Token expired callback.
             */
            onTokenExpired: () => {
                console.log('Token expired');
            },

            /**
             * Smile link SDK close callback.If you want to know which button the user clicked to trigger the close event, you can pass parameters like this.
             * onClose:({reason})=>{}
             * If the value of reason is equal to "close", it means that the user clicked the close icon in the upper right corner of the page to close the SDK
             * If the value of reason is equal to "error", it means that the user clicked the EXIT button after having an error  trying to connect through the Wink Widget
             * If the value of reason is equal to "exit", it means that the user clicked the DONE button on the connection page to close the SDK
             */
            onClose: ({ reason }) => {
                console.log('Link closed, reason:', reason)
            },

            /**
             * Account connect error callback.
             */
            onAccountError: ({ accountId, userId, providerId, errorCode }) => {
                console.log('Account error: ', accountId, ' User ID:', userId, ' Provider ID:', providerId, 'Error Code:', errorCode)
            },

            /**
             * Uploads submit callback.
             */
            onUploadsCreated: ({ uploads, userId }) => {
                console.log('Uploads: ', uploads, ' User ID:', userId);
            },

            /**
             * Uploads revoke callback.
             */
            onUploadsRemoved: ({ uploads, userId }) => {
                console.log('Uploads: ', uploads, ' User ID:', userId);
            },

            /**
             * User event callback is used to capture all the user activities from Smile Wink SDK
             */
            onUIEvent: ({ eventName, eventTime, mode, userId, account, archive }) => {
                console.log('eventName:', eventName,
                    "eventTime:", eventTime,
                    "mode:", mode,
                    "userId:", userId,
                    "account:", account,
                    "archive:", archive);
            }
        });
        smileLinkModal.open()
    </script>
</body>

</html>
User tokens (Link tokens)
User tokens are temporary (expires in 5 hours) access keys that allow you to start the Smile Linking process.
Link initialization for the new user:
-
Create a new Smile user by calling the
/usersendpoint with metadata, such as your user identifier in your product/system. You will receive a SmileuserId. We recommend storing this SmileuserIdin your system for future reference and use -
Provide the
userTokenin your Smile Wink initialization. Make sure the user tokens are requested server-side and yourclient_idandclient_secretare never exposed on the front end.
Link initialization for a returning user or for refreshing the Link token
- Obtain a new user token by calling the
/tokensendpoint with theuserIdthat you have previously stored. - Provide the
userTokenin your Smile Wink initialization. Make sure user tokens are requested server-side and yourclient_idandclient_secretare never exposed on the front end.
<!DOCTYPE html>
<html>

<head>
    <meta charset="utf-8" />
    <meta http-equiv="X-UA-Compatible" content="IE=edge" />
    <meta name="viewport" content="width=device-width, initial-scale=1.0">
    <link rel="icon" href="smileicon32.webp" sizes="32x32">
    <link rel="icon" href="smileicon192.webp" sizes="192x192">
    <title>Smile Wink</title>
</head>

<body>
    <script src="https://web.smileapi.io/v2/smile.v2.js"></script>
    <script type="text/javascript">
        const smileLinkModal = new SmileLinkModal({
            // .....

            /**
             * User token passed from your backend service which is obtained from the Smile API.
             */
            userToken: '<usertoken>', // Put your user token here.

            // .....
        });
        smileLinkModal.open()
    </script>
</body>

</html>
Step 2: Retrieve identities, employment, and contributions data with test accounts
To use the Sandbox, you can use the following example credentials:
| User Name | Full Name | Mobile Phone | Password | Verification Code | |
|---|---|---|---|---|---|
| George | George Palomero Jr. | [email protected] | (+63) 9559991234 | 123456 | 1234 |
| Ryan | Ryan Ng | [email protected] | (+62) 8119994321 | 654321 | 1234 |
| Christina | Christina Tan | [email protected] | (+65) 99996789 | YGUS1 | 1234 |
| Anisha | Anisha Bhatia | [email protected] | (+91) 9511198765 | 123456 | 1234 |
Before proceeding to the next step, make sure to test your implementation. Click on one of the providers on the provider list, and use one of the sandbox credentials to connect the selected provider.
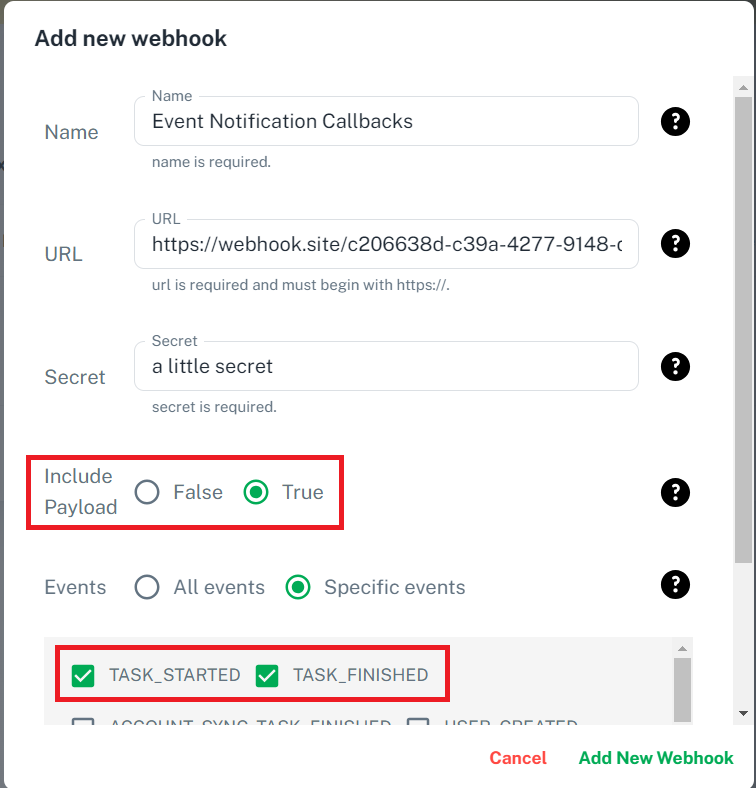
We recommend subscribing to Smile API's webhook payload in Sandbox Mode to retrieve transactions, estimated income, and contribution information with the test account. Through the Smile API's Webhook payload, you can fetch different fields from one specific datapoint or multiple datapoints all at once.
You can enable the Webhook payload through the Webhook section in the Sandbox Mode of the Developer Portal, where you can retrieve data of the three datapoints accordingly by subscribing to the following webhook events listed below and selecting "True" on our Include Payload setting.
| Webhook Event | Descriptions |
|---|---|
| TASK_FINISHED | To return the payload of the selected datapoints. |
| ACCOUNT_SYNC_TASK_FINISHED | To return the payload for the newly synced datapoints. |
| IDENTITY_ADDED | To retrieve identity data fields. |
| EMPLOYMENT_ADDED | To retrieve estimated income data fields. |
| CONTRIBUTIONS_ADDED | To retrieve contribution data fields. |
For personal information verification, you can fetch the following fields from the IDENTITY_ADDED event:
- First name
- Last name
- Primary address
Here is an example response:
{
  "id": "i-123abc456def789abc123def456abc78",
  "fullName": "George Cimafranca Palomero, Jr",
  "firstName": "George",
  "middleName": "Cimafranca",
  "lastName": "Palomero",
  "suffix": "Jr",
  "gender": "Male",
  "dob": "1970-08-24",
  "maritalStatus": "Married",
  "countryResidence": "PH",
  "citizenship": "Citizen",
  "photoUrl": "https://cdn.smileapi.io/image/avatar/v20211115191600/george.jpg",
  "referenceId": null,
  "profileUrl": null,
  "emails": [
    {
      "address": "[email protected]",
      "type": "Primary"
    }
  ],
  "phones": [
    {
      "number": "+639559991234",
      "type": "Mobile"
    }
  ],
  "socialProfiles": [
    {
      "socialUrl": "https://www.facebook.com/gpalomero1234",
      "type": "Facebook"
    }
  ],
  "addresses": [
    {
      "fullAddress": "12 Maybunga St, Barangay Paraiso, Pasig City, NCR, 1600, PH",
      "line1": "12 Maybunga St",
      "line2": "Barangay Paraiso",
      "city": "Pasig City",
      "region": "NCR",
      "zip": "1600",
      "country": "PH",
      "latitude": "14.573454",
      "longitude": "121.085042",
      "type": "Primary"
    }
  ],
  "metadata": {
    "createdAt": "2022-08-19T07:29:08Z",
    "sourceId": "a-123abc456def789abc123def456abc78",
    "sourceType": "ACCOUNT",
    "userId": "tenantId-123abc456def789abc123def456abc78",
    "providerId": "abccorp"
  }
}
For employment information verification, you can fetch the following fields from the EMPLOYMENT_ADDED event:
- Employer name
- Job title
- Start date
- End date
Here is an example response:
[{
    "id": "e-123abc456def789abc123def456abc78",
    "startDate": "2022-07-01",
    "name": "Security",
    "description": null,
    "jobTitle": "Security Guard",
    "department": null,
    "employeeNumber": "EMP-123456",
    "employer": "ABC Corporation",
    "status": "Permanent",
    "endDate": "2022-07-31",
    "metadata": {
        "createdAt": "2022-09-01T01:44:18Z",
        "sourceId": "a-123abc456def789abc123def456abc78",
        "sourceType": "ACCOUNT",
        "userId": "tenantId-123abc456def789abc123def456abc78",
        "providerId": "abccorp",
        "accountId": "a-123abc456def789abc123def456abc78"
    }
}, {
    "id": "e-123abc456def789abc123def456abc78",
    "startDate": "2022-06-01",
    "name": "Security",
    "description": null,
    "jobTitle": "Security Guard",
    "department": null,
    "employeeNumber": "CDE-98765",
    "employer": "CDE Corporation",
    "status": "Permanent",
    "endDate": "2022-06-30",
    "metadata": {
        "createdAt": "2022-09-01T01:44:18Z",
        "sourceId": "a-123abc456def789abc123def456abc78",
        "sourceType": "ACCOUNT",
        "userId": "tenantId-123abc456def789abc123def456abc78",
        "providerId": "cdecorp",
        "accountId": "a-123abc456def789abc123def456abc78"
    }
}]
For contribution information verification, you can fetch the following fields from the CONTRIBUTIONS_ADDED event:
- Employer name
- Job title
- Start date
- End date
Here is an example response:
[{
    "id": "con-123abc456def789abc123def456abc78",
    "date": "2022-06-30",
    "currency": "PHP",
    "amount": 2250,
    "referenceId": null,
    "metadata": {
        "createdAt": "2022-08-24T05:14:37Z",
        "sourceId": "a-123abc456def789abc123def456abc78",
        "sourceType": "ACCOUNT",
        "userId": "tenantId-123abc456def789abc123def456abc78",
        "providerId": "sss_ph",
        "accountId": "a-123abc456def789abc123def456abc78"
    }
}, {
    "id": "con-123abc456def789abc123def456abc78",
    "date": "2022-05-31",
    "currency": "PHP",
    "amount": 2250,
    "referenceId": null,
    "metadata": {
        "createdAt": "2022-08-24T05:14:37Z",
        "sourceId": "a-123abc456def789abc123def456abc78",
        "sourceType": "ACCOUNT",
        "userId": "tenantId-123abc456def789abc123def456abc78",
        "providerId": "sss_ph",
        "accountId": "a-123abc456def789abc123def456abc78"
    }
}, {
    "id": "con-123abc456def789abc123def456abc78",
    "date": "2022-04-30",
    "currency": "PHP",
    "amount": 2250,
    "referenceId": null,
    "metadata": {
        "createdAt": "2022-08-24T05:14:37Z",
        "sourceId": "a-123abc456def789abc123def456abc78",
        "sourceType": "ACCOUNT",
        "userId": "tenantId-123abc456def789abc123def456abc78",
        "providerId": "sss_ph",
        "accountId": "a-123abc456def789abc123def456abc78"
    }
}]
For additional data fields, please refer to the Smile API reference and subscribe to their payloads by selecting their respective webhook events.
Step 3: Setup webhooks
To receive regular updates on a user's accounts, identity, contribution, and employment data, subscribe to webhooks.
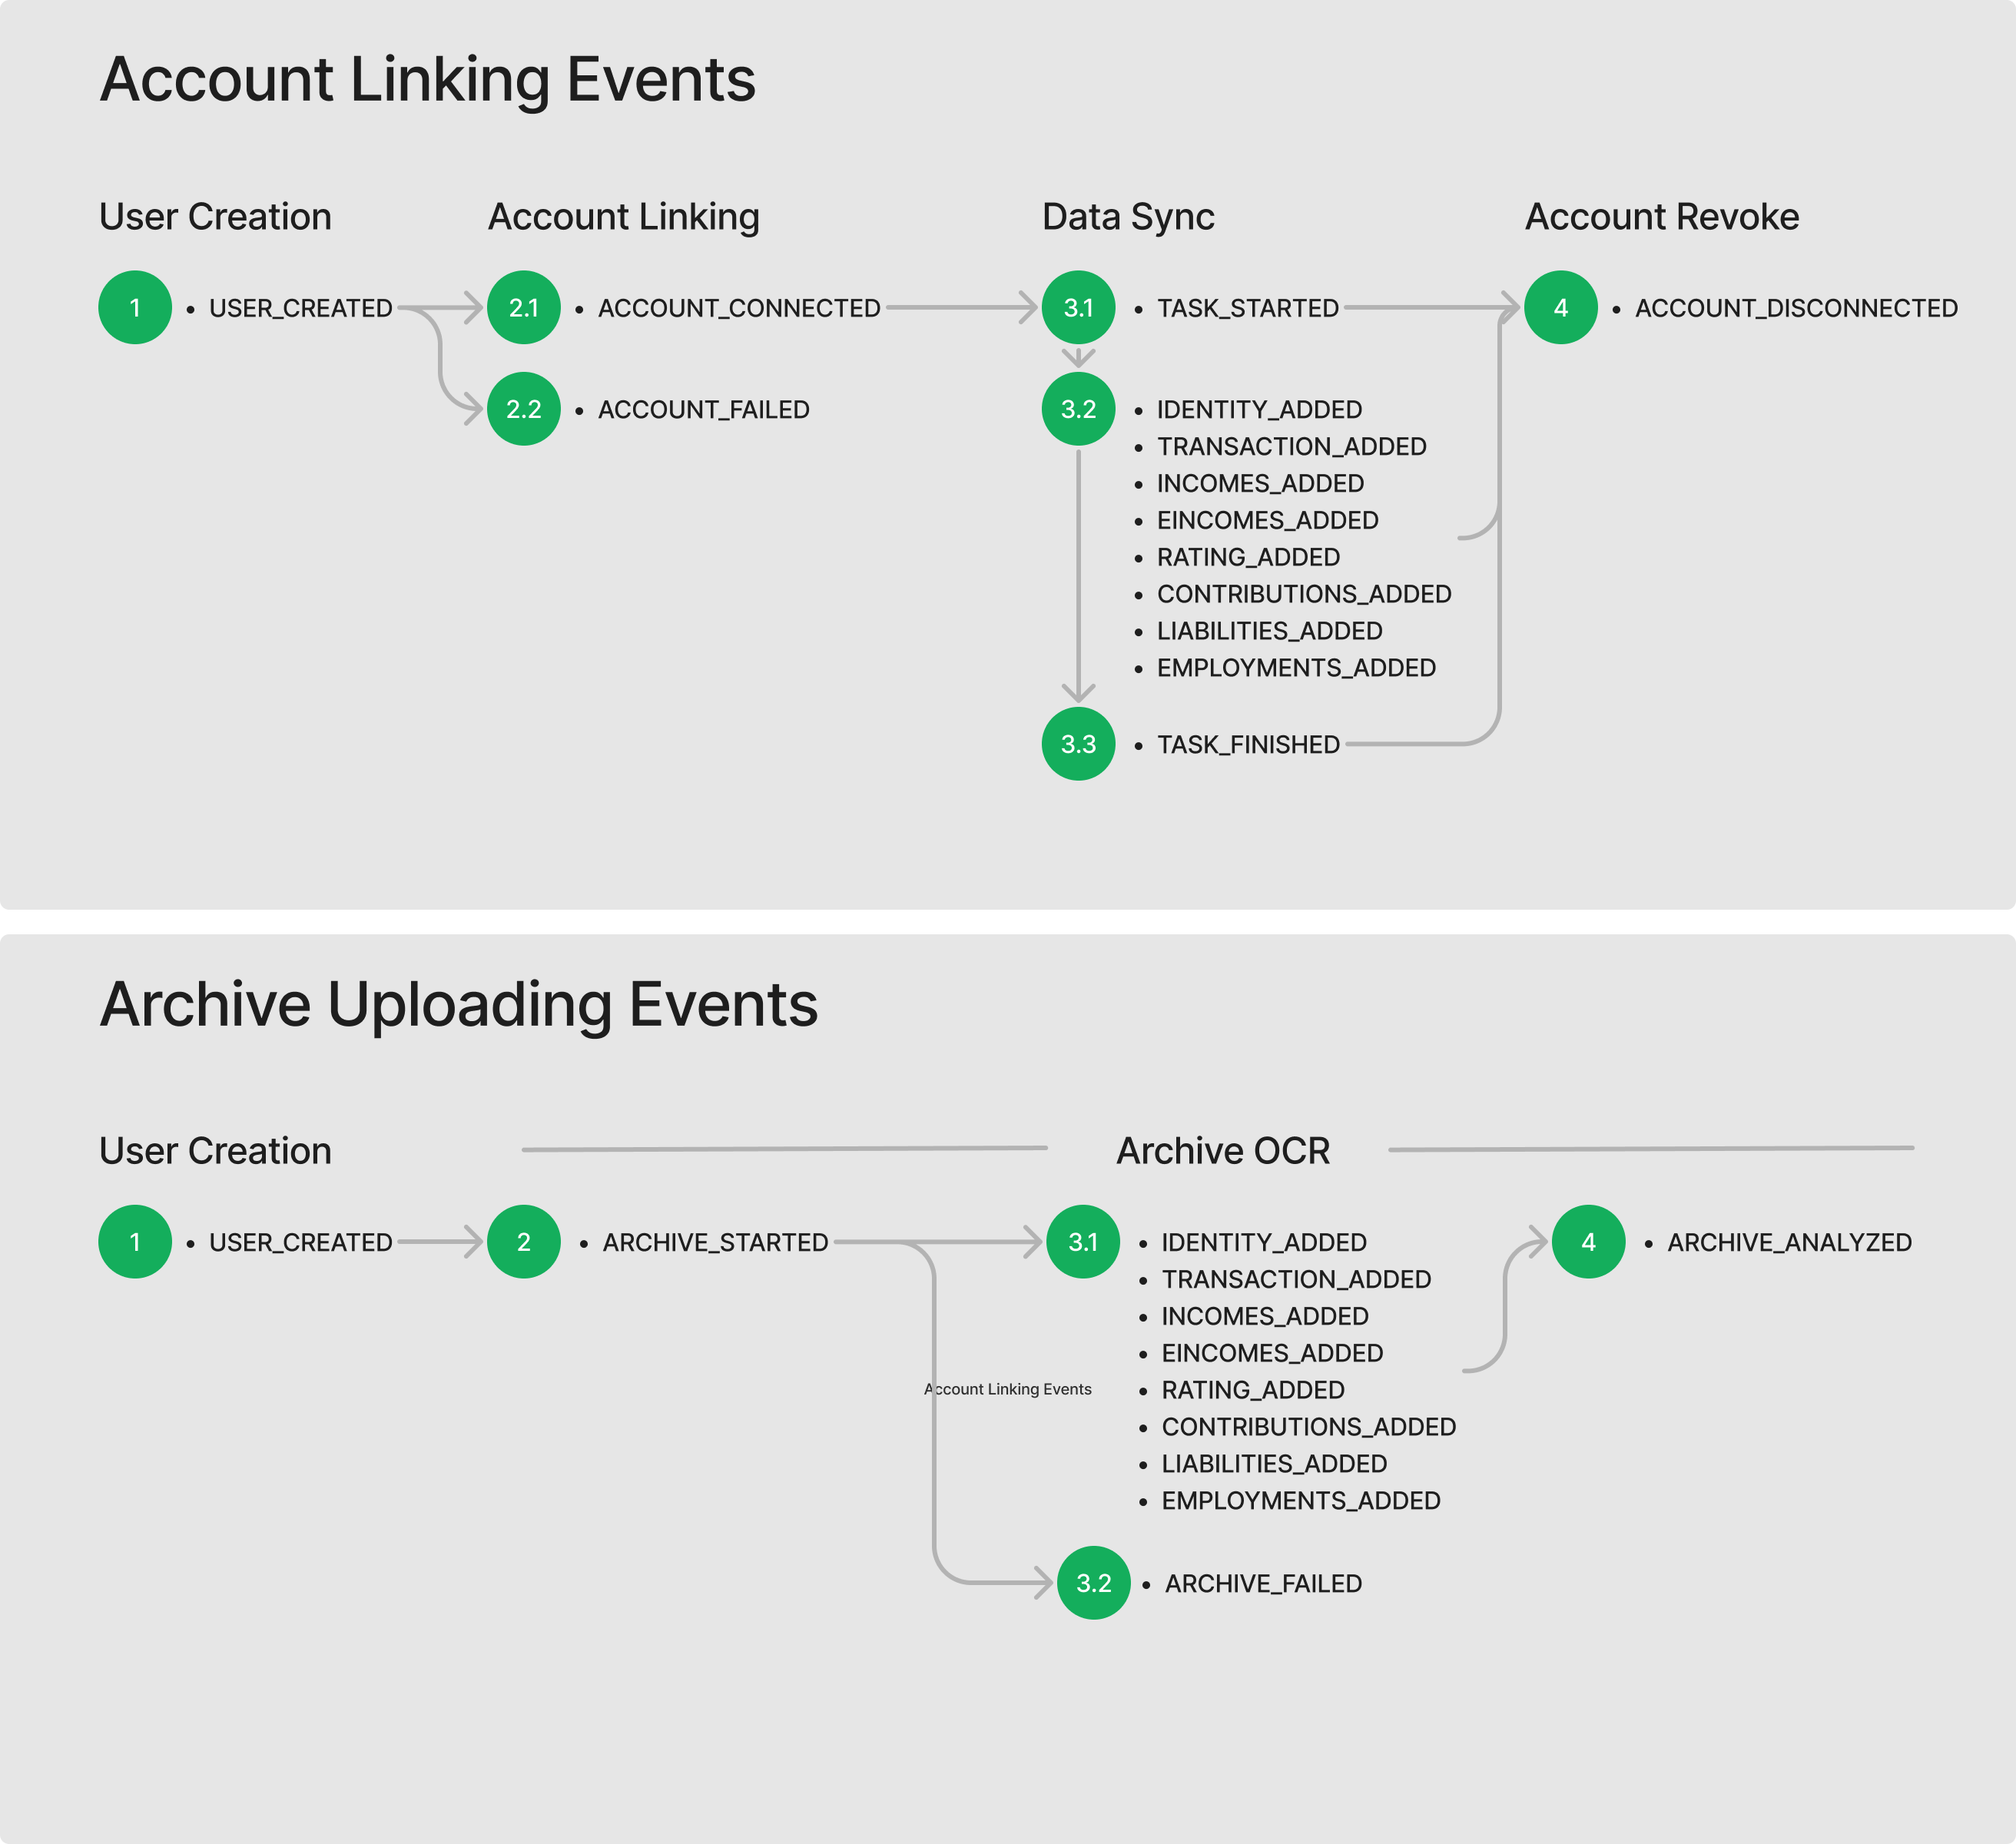
Webhooks send notifications to your system every time something occurs, i.e., when an account is connected, removed, or updated.
To monitor changes to identity, contribution, and employment data, Smile recommends subscribing to the following webhook events listed below, through the Webhook section in the Developer Portal, where you can retrieve data accordingly by selecting "True" on our Include Payload setting.
However, do note that Webhook Payload is only available for webhook events of "TASK_FINISHED" and "Account_SYNC_TASK_FINISHED".
| Event | Event Type | Description |
|---|---|---|
| Task Started | TASK_STARTED | Sent when the data sync process for a user's account is started. |
| Task Finished | TASK_FINISHED | Sent when the data sync task process for a user's account is finished, contains which datapoints have been synced |
Or you can subscribe to dedicated datapoint-related events:
| Event | Event Type | Description |
|---|---|---|
| Contributions Data Added | CONTRIBUTIONS_ADDED | Sent when social security contribution data shared by a user is added. |
| Estimated Incomes Data Added | EINCOMES_ADDED | Payload when estimated income data has been derived from data shared by a user. |
| Transactions Data Added | TRANSACTIONS_ADDED | Sent when transaction data shared by a user is added. |
| ... | ... | ... |
Step 4: Go live and scale
After a successful implementation and multiple successful tests in Sandbox Mode, you can switch to the Production mode for your launch.
Change the API Key pair
The API Key pair can be found in the API Keys section of the Developer Portal. Use a production key when switching to Production Mode.
Start slow
For your first Production accounts, you can test yourself with your accounts, or create an account with a freelance gig platform (i.e. Upwork) and connect that account.
Launch and scale
After testing with your accounts, you can test with your real users. We recommend starting with a small subset of your users to ensure everything works as expected. Then, advance the subset gradually to your full user base.
Updated 8 months ago